Saturday 27 February 2010

Joshua Hoffing


Joshua Hoffine is a photographer I aspire to as I love the way he composes his photoshoots that look like scenes from a film capturing a moment from a story. He uses costumes, elaborate props, fog machines and special fx make up to create a realistic and entertaining scenario mostly within the horror genre. Hoffine uses friends and family as actors and crew, his talent is used merely for fun as everyone works for free. On my trailer I will certainly be using family and friends as actors and crew, and almost everyone will work for free!

Friday 26 February 2010

Inspirational images

Some images I've come across that have inspired some of my make up ideas and decisions...


After completing my first shoot, I can see the connection with the way I use thread and the way they've used similar to sew up the mouths of these models. This make up artist might have been inspired by a surgeon sewing up an operation, or in the case of the female image, tying up a corset. I like the way their use of black thread as I used red in my last one, and I may take inspiration from this to apply a similar technique to my work at some stage.

Wednesday 24 February 2010

Another Trailer Meeting..

Today I went for another meeting with Ant to give him a list of dates to film the trailer. I have gathered together a list of actors to take part, what date and times they are available and a list of locations so that I can organise a call sheet. We went through the list and narrowed down a weekend in which the majority of cast and crew could attend and then any other filming needed can be done the following week.

I contacted everyone on the list to confirm they were still available and committed to take part. A couple dropped out but I wasn't worried too much as I have cast double the amount I need as a back up plan, and I can always do with extras. I have learnt from past experiences that people let you down last minute therefore a couple of my friends who are sisters that used to do performing arts at college have said they will 100% take part and as they are close friends I know I can rely on them.

When I was thinking about the cast I wanted a diverse group with a variety of different backgrounds and a mixture of ages to represent real people as opposed to "good looking actors". I aspire to Dazed and Confused as it is an independent magazine that combines fashion with art, and known for using young up and coming British talent, you won't see the obvious and popular models and celebrities in this magazine. With a similar ethos in mind, the approach to my trailer will use a combination of fashion with film as opposed to fashion with art.

Tuesday 23 February 2010

Tutorial Feedback

I went to my tutorial today and showed them my sketchbook of designs. They were impressed with them visually and were excited to see the finished images from the shoot. I will need to develop these designs and use fine artists' work to inspire some more ideas on how to use different mark making effect. I'll also look at their approach to composition and the different ways they modify their work. This will help me not only with my design process, but also the artistic application of make up on my models face. I consider my self an artist who uses make up but there are no rules in what make! Therefore I can explore different ways of applying mixed media and painting onto the face just as a fine artist does on a canvas. I feel that there should be no limits with make up, and I want to push this forward and create interesting and original designs.

I also explained my project: that I was doing a trailer for a horror/zombie film. Ant is directing, and I am discussing my ideas because I'd like him to film it in a way that will showcase the make up. I'll probably need to get my friend Steph to edit a second version that will purely focus on the make up with the story taking second place. This one will be an expression of conceptual thinking, with plenty of horror. Inspiration will be varied, taken from illustration, graphics, horror films, intense heavy grime music, distortion and disfigurement, and the abnormal. I will document the design thought process and inspiration references in a blog which is a way to show my development and ideas. This will also be an easy link to show directors and make up artists I wish to work with in future.


FEEDBACK

I was told to research and view horror films that use SFX make up and see how I can interpret the same visual experience. Also it will give me an idea of how horror films are created when I get round to filming for my trailer. Also stylised films, see how they create their ideas and how I can differ my work from theirs - my competitors. See what stylised films are out there and how can I make mine better and different.

I have been advised to watch 'The 5th Element' and any other Luc Besson films and take note of the make up and styling they use. Star Wars and Moulin Rouge have extreme make up designs that create a visual feast for the viewer and is partly why the films are so entertaining.

I need to consider why I am developing particular designs and how they fit in the trailer. Who is my target market? What is my reason for doing a trailer and how do my research and ideas develop into producing the trailer.

To answer these questions I have written myself a brief so that I will be able to refer back regularly to keep focussed, and everything is explained. I have also distinguished my target market and displayed it on my blog. It will also explain my motivation as a make up artist and why my project idea is so different from any other. This is vital to give me a head start on other make up artists, both established or newbie, in this very competitive industry. I know I'm very competent, I'm certainly very enthusiastic, I just need to show it, and get my work seen by as many people as possible in order to succeed.

Note: research America's next top model - death murder scenes. It will give me examples of how horror and film can be combined with fashion and editorial. Which is something I wish to achieve within my project.

Monday 22 February 2010

First Zombie Shoot

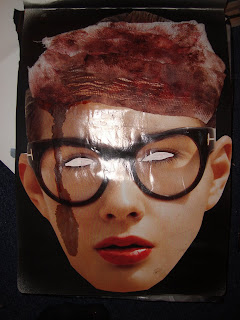
This was my first zombie shoot... Following the make up designs I created in my sketchbook, I have produced a make up that gives the impression of a zombie.

I experimented and collaged different images and materials to create tear sheets and designs, so that in my shoot I knew exactly how I wanted the make up. Using these initial designs, I placed each stage on the face one by one, leading to the final design that I can use as a video clip. This will give me the opportunity to see what looks best and what looks most effective, photo or film?

The studio was booked 5-8 so ideally I wanted to start the make up at 3 leaving plenty of time to relax and get the make up on without rushing. Unfortunately my model arrived at quarter past which immediately made me behind time, as it took a while for her to settle down and get her make up off. I made sure she was comfortable and if she needed a drink as I wanted her to feel at ease, and I wanted to be as professional as possible which is all good practice for once I leave uni. I made sure she had a gown on as I wouldn't want anything to go on her clothes in case it stained. I started with her hair as I wanted to get it all in place before I made a start on the make up, otherwise I might not have any time for corrections. The hair went surprisingly well (I was really nervous as I lack confidence in hair styling), and because I had practiced a lot beforehand I was able to grip it up in the design I had planned, really quickly.

Once the hair was in place I started the make up. I made sure she didn't have any allergies or sensitive skin before I started and once the base was applied I stuck on the red thread. I then wanted to get the contact lenses in her eyes. Although I wanted to leave them out for as long as I could in case they irritated her eyes, I wanted to insert them before I did her eye make up, as they could water and ruin the eye make up. After we both washed our hands intensly, I got Lauren, my model, to put in the contact lenses herself. I gave her instructions on how to put them in, but it took about ten attempts. Once they were in I gently patted under her eye with a cotton bud so as not to irritate her eyes further, but to clean up any water or tears, and began with her eye make up. The photographer Kimberly Garrod, arrived on time and set up the lighting straight away so that we were ready to shoot. I had a bit of trouble as her eyes kept watering from the mascara! (Don't know why). Consequently I had to keep wiping the make up with a cotton bud and re-applying concealer, powder and eye liner, which was hard work and got a little messy. After a while they stopped watering and by the time we were in the studio ready to shoot I was able to correct the make up for the final time. I think next time I would have left the powdering to the end so it would have been easier to correct.

I told the photographer exactly what I wanted for the first shots and then left it up to her. I checked the make up on the camera viewfinder, that is the best way to see how the image will look. I saw that the glue looked a tad shiny which I hadn't noticed looking at her on set, and dusted a little translucent powder over the glue parts to take away the shine. I checked in the camera again and it looked much better.

I added more make up bit by bit for each section so that there was a build up in each picture, to make a series. I was extremely happy with the initial make up so there was nothing to lose by building on it. I had a rough idea of what I was going to apply but I wanted it to be spontaneous and apply it randomly. There were certain aspects I preferred more that others, I experimented with layering different materials of ribbon and string round her head and getting her to wear geek glasses to make it more fashion styled however it didn't really suit the theme and just looked out of place as their was no reason for the items to be there, but on the whole I was extremely happy with how the shoot went. I found that by going wild and doing my own thing with the build up of make up, I was able to create a more expressive look resulting in something looser and more individual, which is exactly what I wanted to achieve.

I was extremely happy with how things went, I got the first image spot on, and then I was able to go wild and experiment on the face in a spontaneous way, which I was also pleased with. There were a couple of looks I wasn't sure about but wanted to do anyway to see what it would look like in the moving clip. I have enough looks and images to work on for the clip. So now I look forward to getting the images back.

This was my first zombie shoot... Following the make up designs I created in my sketchbook, I have produced a make up that gives the impression of a zombie.

I experimented and collaged different images and materials to create tear sheets and designs, so that in my shoot I knew exactly how I wanted the make up. Using these initial designs, I placed each stage on the face one by one, leading to the final design that I can use as a video clip. This will give me the opportunity to see what looks best and what looks most effective, photo or film?

The shoot went very well and I was extremely happy with the images I got back.


Thursday 18 February 2010

Meeting to discuss the trailer

Today I went for a meeting with the director, Anthony to discuss ideas. He has a basic storyline about a young man who took a magic tablet and turned into a superhero. I told him that my trailer had to based on zombies and the main focus had to be my make up, so we adapted it so the boy who took the tablet turns into a zombie instead. Well, that was the initial idea. We watched various different horror trailers on You Tube such as '28 Days Later', '30 Days of Night', 'Land of the Dead', 'The Strangers', 'Hostage' and 'Saw' which got us into mood and started triggering ideas. One idea lead to another and finally we came up with a complete narrative for the story that we were both happy with, and that would exhibit my make up skills well. We started brainstorming every aspect and idea for the trailer. One main consideration is location: which we decided after watching clips from '28 Days' that we should shoot one particular zombie scene in London opposite the Houses of Parliament, and next to the London Eye as there's a fantastic straight walkway running next to the Thames that would be perfect for a zombie chase, which is one of the scenes in the trailer.

Why London, and why near the Houses of Parliament?

As I am from Kingston, south west London, it's easy to access as its only 2omins away and an easy meeting point, and make up base, for everyone else taking part. The Houses of Parliament and The London Eye are two of the most well known monuments in London, so the viewer can automatically relate to the location, as most people have either been to London, or recognise it from photos or films, this will automatically help make my trailer visually entertaining. There are scenes shot in '28 Days Later' at sunrise over Waterloo Bridge that look fantastic as you can just make out the Houses of Parliament in the background. When I watch it I feel proud to live in London but slightly uncomfortable that 'zombie's' could be roaming around the capital.

We also decided to shoot the walkway at the Embankment as it's a long strip that would be perfect for filming the zombie chase as there is the bridge in the background and steps to run down from. Also there are plenty of lights in the background which will look good on camera.

We will have to film at 5am as that is when the sun rises, and we need to film when absolutely no-one is around, as in the trailer everything is frozen in time, except for the zombies. I will have to make sure the make up is done well in advance, we'll need to leave at 4am to get to central London and set up. We'll need time to park and find the perfect location. We'll have to be quite speedy and not mess around, as it will quickly get busy and we won't be able to film.

Another location is our local off-licence where I used to work, as there is a part in the trailer where he steals money from the till. This would be ideal as I know the owner extremely well and he would definitely let us film there. He also has an extremely old cellar under the shop that's dark and dingy. It's where he keeps his stock, so it's full of boxes and bottles. Its very musty and eerie and looks like an old drug dealing den, so would be a perfect location to shoot the narration scenes where the boy is given the pill. I will double check with Frank the owner and ask if he'd mind us filming there, then we can start making dates.

Sunday 14 February 2010

Preparation

Today I have:

1.Booked the studio so that I have all my photo shoots in my diary. I can then concentrate on creating ideas and experimenting with these in preparation. This will give me more time to explore various methods and ways of creating a particular look such as using different make up products to see what works and what doesn't; and textures - which ones look better on the skin and how they represent a zombie.

2. Practiced my hair designs for my first shoot. I printed off a selection of images from magazines so that I have a reference on how hair pieces can be attached. I taped the images to the mirror when I was working to give me inspiration. I found that practicing on a dolls head was a lot easier than practicing on a human head, so once I had grasped it on the dolls head, I moved on to practicing on my (long suffering) flatmate's hair. By doing this and making sure I could create the effect I wanted, meant that on the actual day I would be able to do it perfectly in far less time, giving me more time to spend on the make up. I found that because I was used to 'shoving pins' onto the dolls head, I would have to be extremely careful not to stab my model with a hairpin! This is all useful practice for once I get employed after uni. I enjoyed creating a big hair look for this design as it isn't often I use hair pieces, and I found by constant practice that I gained more confidence at putting hair up, which is a great achievement for me.

3. Researched different lighting effects/camera angles and poses for the shoot. I have looked in Wound magazine as it's very much a fashion/art magazine. There were a few images I liked which were grainy, in black and white. I liked them because they were quite dark and edgy, and gave a texture in the style of old horror movies. This could be a great look to consider so I have the tear sheet to show the photographer. The rest of the magazine was mostly conceptual and had few poses that I could use for my trailer. I decided that as the make up is to be so striking and detailed, it would look better as a single headshot, I don't want to distract from the make up. Also, as the hair extensions aren't quite long enough to wrap around her whole head I had to pin them securely at the back, therefore you'd probably see them if it was an action body shot. By doing a head shot I'll be able to get a detailed close up of the make up. This will look fantastic in my portfolio as well.

4. Asked my model to bring a plain black tank top for the shoot as I don't want the clothing to take any focus away from the make up. I can also pull the straps down if I want.

5. Started creating design ideas in my sketchbook to express the sort of mood and perception I want to give. I've made my own template of a face on tracing paper and from that I've stuck on various areas of design, photocopying each stage, so I can see the progress and what looks best. I have cut out parts of the photocopies and again kept layering over the top and photocopying, resulting in a finished design, built from all my ideas. I find this method of working works well for me as I find it easier collaging and layering the images I like, experiment with the textures I wish to use, and combining make up and paint to produce a mood and atmosphere as well as a design. Richard Hamilton is an artist I aspire to, as he creates his artwork using a similar method and it is evident in his work that he got his inspiration from a build up of mixed media. Once I have an idea displayed on paper It's easier to see how the composition flows and whether I need to adjust certain parts to improve the structure. I can also establish what colours go well together. For this particular shoot, I want red to be the only vibrant colour as it needs to stand out as the main focus to symbolise blood. Any other colour will distract from the red so I will only use black and white for other parts.

6. Confirmed the date and time with my model and photographer so that they will both arrive on time as I have limited time in the make up room and studio. I have also told my model to arrive with no make up to save time removing it once she arrives.

Friday 12 February 2010

Dissertation Horror Make up Clip

http://www.youtube.com/watch?v=fN3G1i1XSOw

Please watch my video clip made from a series of images that show the stages of horror make up from 'subtle to scary' showing the impact of the build up. I collaged over some of the images for more fear factor, and the video clip was edited by 'Stephanie Bourke'.


This has been a major inspiration as I love the way it has been edited with scary flashing effects which enhances the tension which is also supported by the intense music to thrill the viewer which was the intention.

I want to create a similar effect for my trailer as I feel it is a good way of exhibiting the make up and creating a shocking yet effective way to entertain. Because Steph edited that clip I have asked her to do a seperate version of the trailer in a similar was to this one that will be an abstract trailer focusing on my make up but setting a thrilling atmosphere which will reflect the horror theme.

Thursday 11 February 2010

Thread


I often work with thread in my make up. I like the texture, intricate detail and shapes that it creates. I've used thread in red throughout my make up designs for this project, to symbolise the blood of a zombie.


...This is one of my experiments before I did my first zombie editorial shoot. I found that spirit glue stuck the thread on better than duo, but I had to powder over it to stop the shine in translucent. I drew the bottom lashes on with eyeliner gel as I wanted a matt look rather than greasepaint which is too shiny, and smudges easily.

Wednesday 10 February 2010

Practicing a zombie head bandage using hair extensions..


I found it easier doing my design on a doll's head as you can be more hard with it and the hair is more flexable, therefore I had to practice on a real head so that I would be able to do it effectively and quickly on the day of the shoot. I experimented with layering the two shades of blonde hair extensions in different ways to look like a head bandage. I found that by doing this I was able to develop an efficient technique of layering in the most effective way which would save time for when I do it on the actual shoot.

Monday 8 February 2010

Researching...

I have been watching trailer after trailer on You Tube for inspiration, making notes on how long they are, what music they use, how it's cut to the music, and getting an overall idea of how it should be set out. I'll choose ideas to use as a template for mine so that it looks as professional as possible.

With this in mind, I've decided to use my next editorial photo shoot as an opportunity to experiment with moving image and see how it differs from film. Therefore I will build up the make up in a similar way to my last video clip, but give myself more to edit from. I got the idea from flip books. I love how you can create something unique by taking a series of images and adding more make up each time, and editing it in the right place. I was inspired by a moving image clip I saw at the Show Studio exhibition. I have tried to look it up but haven't managed to find it so it only remains a vivid memory. This clip would give a completely different effect to the original images and I'll be able to contrast and compare the two finished pieces.